Playing music while you stream is a great way to add an extra layer of entertainment for you and your viewers. If you’re looking to find out how to play music through OBS or even show what Spotify music you’re listening to on stream then we’ve got you covered.
Gone are the days of your chat constantly asking “what song is this?”. In this guide we’ll show you the 3 best methods for displaying a “Now Playing” through OBS and SLOBS to show your viewers what music you’re playing on Spotify.
We’ll also quickly show you how to make sure your Spotify music is properly being captured in OBS so your viewers can hear it.
I’ll be using OBS Studio for these guides, but the Streamlabs OBS GUI is more or less the same and has all the same functions so it’ll be easy to follow along.
Adding Spotify Music to OBS
Sometimes something so obviously simple can throw people for a loop. Before we get into displaying what music you’re listening to in Spotify on OBS, let’s make sure your audio is actually being captured and coming through.
1. Open up your Spotify app.
2. Start playing a song.
3. You should now see audio activity in your OBS or SLOBS audio mixer under Desktop Audio.
If you want to learn how to split your audio sources so you can control your music, gameplay, Discord, etc. all individually, check out our guide on how to split audio in OBS.
How to Display Now Playing Through OBS
Now let’s get into the 3 methods for showing Spotify on OBS.
1. OBS Window Capture
This is the easiest method of the three and won’t require any 3rd party applications. It involves using the Window Capture source option in OBS and cropping your Spotify window so that it only shows what song is currently playing.
Here’s how it’s done:
First, make sure you have Spotify opened up already.
1. Add a new Window Capture source and name it something like, “Spotify”.
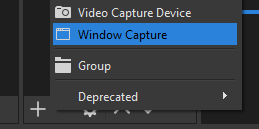
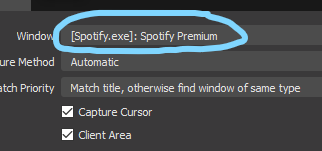
2. Select Spotify.exe under the Window dropdown options and click OK.
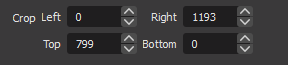
3. You’ll now have your entire Spotify window in your OBS scene, but we’ll want to crop it so it’s just showing the article and track title.
Two ways to crop in OBS:
a) While holding ALT and having your Spotify Window Capture source selected, hold left click on any of the red squares around the window and drag your mouse inwards to crop the window.

We have a video here if you need a better visual example on how to do it.
b) Right click your Window Capture source > Transform > Edit Transform…(shortcut CTRL+E).
![]()
Now adjust the crop values found at the bottom of this window.
You should now have whatever music you’re playing in Spotify showing up on OBS!
IMPORTANT: If you have your Spotify window minimized while a song switches to a new one, OBS won’t update it until you open up your Spotify window again.
To make sure the Window Capture updates your Spotify now playing each time a new song comes on, you’ll need to have your Spotify window opened up full time.
So if you stream with a second monitor, make your Spotify window as small as possible and leave it up on there if you can.
Just Spotify Text (remove background)
If you want to remove the grey background from your Spotify window so it’s just showing the song text information here’s how to do that:
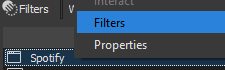
1. Right click your Spotify Window Capture source and click Filters.
2. In the Filters window, right click on the darker part (left side of the window) > add > Color Key. Or click the + icon on the bottom left.
3. Under Key Color Type, select Custom Color.
![]()
4. Click the Select Color button just below that to the right.
5. In the new Key Color window that popped up, click Pick Screen Color.
6. Your mouse cursor will now look like a crosshair, so make sure your Spotify Window Capture source is visible in your OBS scene, then snipe (left click) the grey Spotify background color so the filter knows which color it needs to key out.
You could also try adding this value in the HTML: box #181818. That’s what my Spotify window picked up.
7. Click OK, and close out of the Filter window and you should now see your Spotify capture without its background.
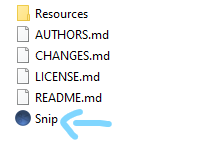
2. Using Snip In OBS
Snip is an application that updates a text file with the current song you’re listening to on Spotify or iTunes. So we can use this text file in OBS to output the track title and artist name on stream.
It also pulls the album artwork using a jpg file, allowing you display that if you’d like.
Here’s how to set everything up:
1. Head over to the Snip download page here: https://github.com/dlrudie/Snip/releases and download and extract the latest release zip file. As of August 2021 it’s Snip v7.0.5.

2. Once you’ve extracted the zip folder, click the Snip file and connect your Spotify account once prompted.
Two new files will be created in the same folder. A Snip txt file, and a Snip_Artwork jpg file.
3. Click and drag the Snip txt file into your OBS. This will create a new text source under your sources, and will be the text that will show the artist and track title from what you’re playing in Spotify.

If clicking and dragging doesn’t work, try Sources > Add > Text (GDI+) > Name It > Select the “Text read from file” box > Browse > Find and select the Snip txt file.
I’d actually recommend using the Text (GDI+) method if you’re wanting to increase the text size and keep the font quality looking crisp.
I noticed when you just drag the txt file over and try to increase the size it looks a little blurry.
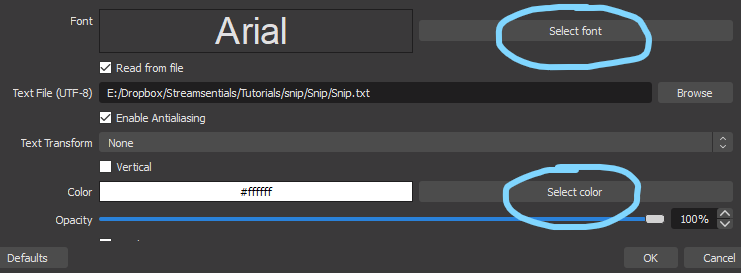
Customizing Your Spotify Text
Under the text source properties (right click > Properties) you have a bunch of options for customizing the appearance of the text. Things like the font choice and color.
Text Scroll
You can also make the text scroll utilizing the Scroll filter. Right click the text source > Filters > click the + icon bottom left > Scroll > adjust the Horizontal Speed.
We have a more in depth guide on scrolling text in OBS here if you want to get a better understanding of it.
Display Album Artwork from Spotify
Here’s how to show the album artwork next to your track artist and title text in OBS:
1. In the system tray of your desktop (bottom right), right click the Snip icon and make sure the Save Album Artwork option is checked.
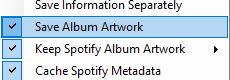
2. Under the same menu, hover over Keep Spotify Album Artwork and select Medium or Large. This will make it so the album image isn’t blurry if you want to make it larger in OBS.
3. In your Snip folder, find the Snip_Artwork jpg file and drag it into your OBS scene.

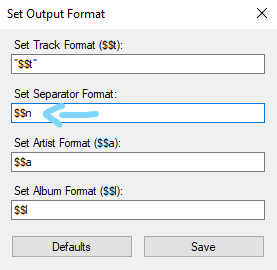
Separate Track Title and Artist Name on Two Different Lines
Here’s how to make it so the track title is above the artist name:
1. Right click the Snip icon in your system tray and select Set Output Format.
2. Under the Set Separator Format box, type in $$n and click Save.
Troubleshooting Snip
Snip can be a little buggy at times so here are some things to try if it’s not properly updating the track information or album artwork in OBS:
- Try switching snip to iTunes under the system tray Snip settings, then switching back to Spotify.
- Try deleting the sources in your OBS and adding them again. I noticed when I was making changes to the Snip settings, they wouldn’t update until I added a fresh txt and jpg source.
- A good ol’ OBS reboot can sometimes help.
3. Using Last.fm + Pixel Chat
This method for adding Spotify now playing to your Twitch or YouTube stream gives you something a little more cool looking.
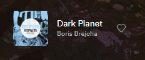
Here’s an example of what it looks like:
![]()
Note: As of August 2021 when I was setting this up, Pixel Chat said they require their paid “pro” option in order to use their Spotify integration, but it still worked without paying for it.
So for now this option is still free, but just a heads up you might need to pay eventually.
Also sometimes the graphic wouldn’t update in OBS, and when it did it would take about 1 minute 30 seconds after the new song was already playing to update the info (maybe it works better if you pay for their pro subscription?).
Either way, if you still want to try out this option follow these steps:
Last.fm Setup
1. Create a Last.fm account if you don’t have one already here: https://www.last.fm/join
2. Once you’ve created and verified your account, hover over your profile at the top right of the screen and click Settings.
3. In the settings page, click Applications and connect your Spotify account.
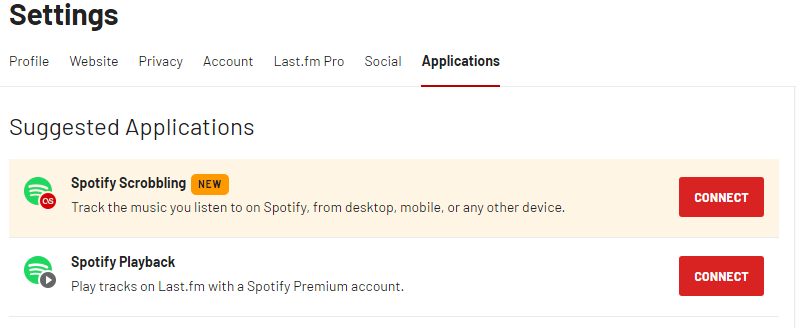
If you have Spotify premium feel free to connect to both options. If you don’t have premium just use the Spotify Scrobbling option. It’ll still work if you don’t have premium.
Pixel Chat Setup
1. Sign up to Pixel Chat by connecting your Twitch account here: https://pixelchat.tv/
2. Once in your dashboard, access your profile page by clicking on your profile pic at the bottom left of the screen or click this URL: https://pixelchat.tv/dash/profile
3. Connect your Spotify account.

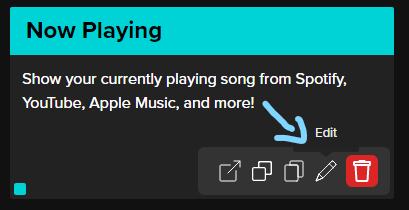
4. After you’ve linked Spotify, click the Overlays button from the left side menu and then click Create New Overlay (top right), then select the Now Playing option.
5. Click the Edit button on the Now Playing overlay you just added.
6. Scroll down to the Options section, and toggle the Stay open all the time option on.
7. Keep scrolling down to the bottom and type in your Last.fm username that you just created under the Last.FM username box. It should take a few seconds/minutes to connect.
Customizing The Look
In the Overlay edit page you can change the style, font, and colors of the Now Playing overlay.
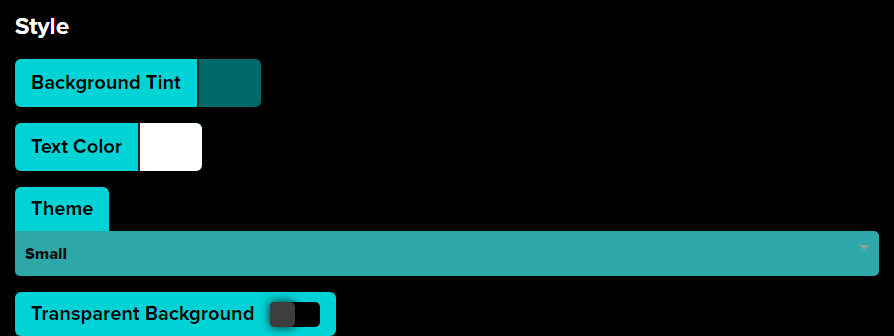
I recommend at least changing the Theme to small or minimal to make it easier to incorporate into your stream.
Adding Now Playing to OBS
Now to get this Now Playing overlay into OBS follow these steps:
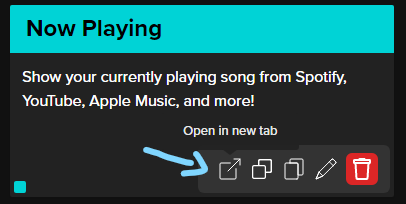
1. If you’re still in the edit page of your overlay, scroll to the very top and click the icon at the top right that opens up into a new window.
Or in the general overlays page, click the Open in new tab button on your Now Playing overlay.
2. Copy the URL of the new window.
3. In OBS, add a new Browser Source and paste the URL under the URL box.
![]()
That covers all the best ways to display what music you’re playing in Spotify on OBS or Streamlabs OBS!
If you’re worried about DMCA strikes, check out our best list of Twitch safe music.