Managing multiple audio sources in OBS is one of those steps you take as a streamer once you’ve gotten the basics down. If you’re at that stage of wanting more control over your audio to provide a better viewer experience then let’s see if we can help you out.
This article will show you how to split your audio in OBS, so you can have separate audio sources for things like your mic, desktop audio, music, and gameplay.
If you’re looking for ways to mute your Discord in OBS then this guide will teach you that as well.
Step 1: Install Voicemeeter Banana
You can use Voicemeeter to separate your audio sources into different audio channels so you can change volume or mute different audio sources at the touch of a button. This makes it super easy to offer a professional stream to your audience where you don’t get bogged down in the technical stuff.
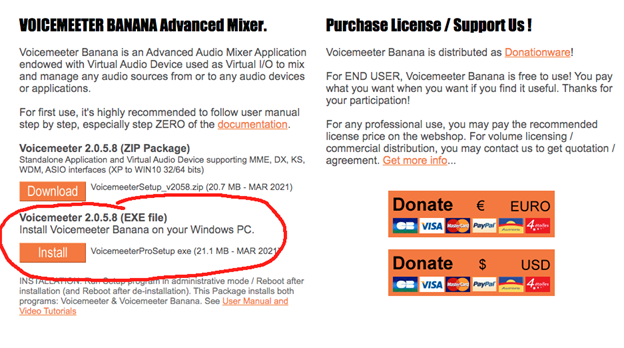
To start, follow this link to the Voicemeeter Banana site. You should see a webpage like the one below.

Scroll down a little until you reach the Install button which you can also see circled in red in the picture below. This will download a small 20MB .exe file which contains the full Voicemeeter package along with Voicemeeter Banana.
Bear in mind that Voicemeeter is only available for Windows at this time.
Now, we’re not quite done with the downloading, there is one other important thing we need to download to make the setup work.
Scroll up to the top of the same page and you will see several tabs, one of them is the Banana tab you are on, you need to click on the Virtual Audio Cable tab.

When you’ve clicked on it you should see the big download buttons on the right and you just need to download the Windows version.
So you now have two files on your computer that you need as follows.
- The first will be called VoicemeeterProSetup which is the .exe file that you can click on and install like you would any other program.
- The other file is a zip file called VB_Cable_Driver_Pack43 which you need to unzip. Inside the unzipped folder you need to find one file called VBCABLE_Setup_x64 (an application) and then – IMPORTANT – right click and run as administrator, it will not work if you don’t do this.
When you finish restart your computer and you’re done with the installing process.
Step 2: Setup your computer’s audio
For Voicemeeter Banana to properly split up your audio, we need to adjust the default sound placement on our computer. Go to Start on your Windows menu then Settings and click System and then Sound. You should see a menu like the one below.
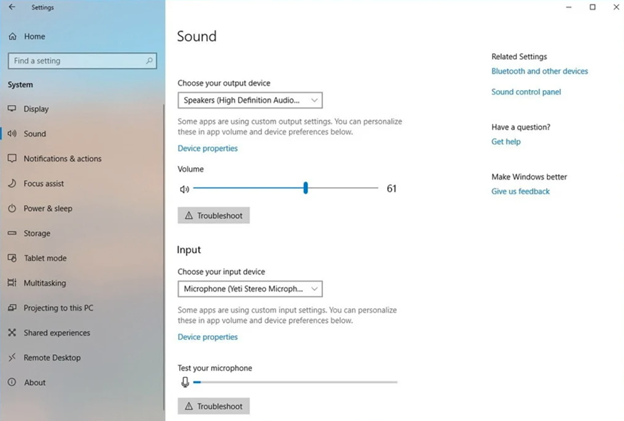
You need to change the Output Device to Voicemeeter Input and the Input Device to be Voicemeeter Output. And yes there’s no mistake in there the input and output are swapped for some reason!
Note: if you plug in a new audio device to your computer these settings will be automatically changed and you will have to set them up again. Worth bearing this fix in mind!
Spotify Music Setup
Now we want to make sure your computer audio is set up with programs like Spotify or Itunes. I’ll be showing Spotify here but the process is similar for any other program.
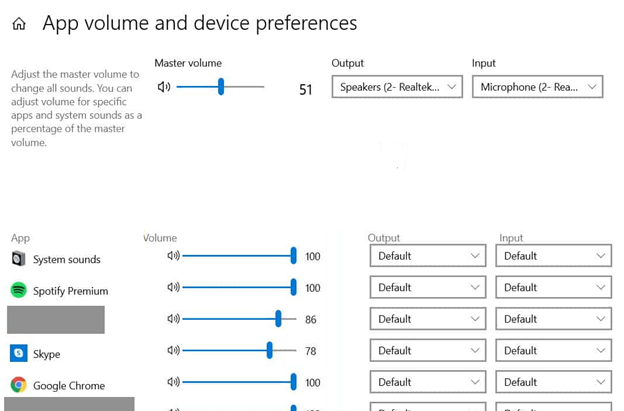
Firstly, play some music through Spotify in the background then go back to your Sound settings on windows and look at the bottom for Advanced Sound Options and then App Volume and Device Preferences.
You’ll see a list of audio devices along with their Outputs and Inputs. Change the Spotify Output to Voicemeeter AUX Input.
Step 3: Setup Voicemeeter Banana
Now you need to open Voicemeeter Banana and you’ll see a screen like this.

We’re going to break the setup of Voicemeeter into three separate parts for your outputs and inputs as follows.
Hardware Out
If you look in the top right corner you can see A1, A2, and A3 next to Hardware Out. This is where you send your audio.
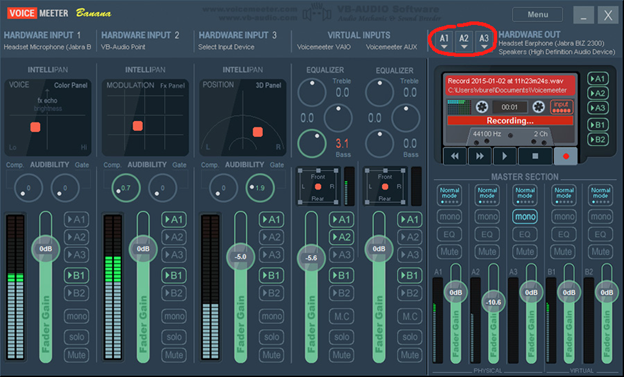
For A1, you should choose your main listening device which will probably be the headset you are wearing or maybe a monitor or speakers. So click on A1 and choose the device you want to use.
If you have multiple listening devices, for example, a headset for gaming and separate speakers for music, then choose your second device on A2 and so on.
Hardware Input
Now if you look towards the left you can see Hardware Input 1, Hardware Input 2, and so on. This is the audio that Voicemeeter receives from devices like your microphone or headset.
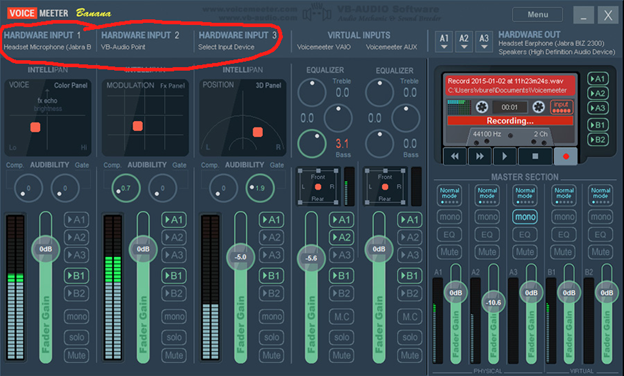
Now click on Hardware Input 1 and select your main sound device which will probably be your headset or microphone that you use to talk into.
You should start to hear the sound being monitored through your A1 device – you can click on the A1 button under Hardware Input 1 to stop monitoring. The big slider here adjusts volume so you can play around with that too to make sure it’s working.
Next, click on Hardware Input 2 and select WDM Cable Output which will separate your Discord audio in OBS – more on that later.
Virtual Input
Next, take a look at the middle of the Voicemeeter software and you should see Virtual Inputs. This is for the sound that comes from your computer and not a hardware device, for example, your virtual inputs might be Spotify, game sounds, and the like.
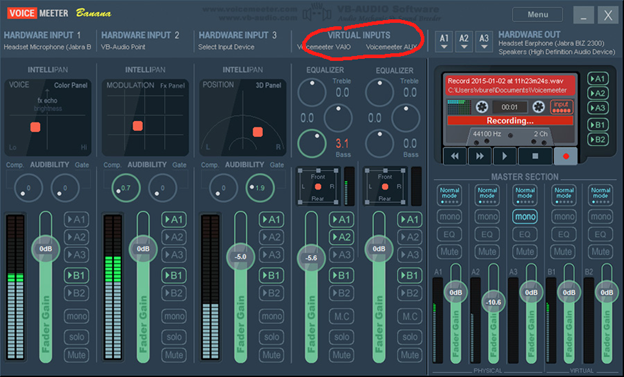
As we’ve already selected Voicemeeter as your default audio in Step 2, your computer’s sound is already being routed through Voicemeeter under Virtual Inputs.
- The slider on the left should adjust your system sound like gameplay sound.
- The slider on the right should adjust your Spotify (or any other program you set up) sound.
Now would be a good time to play some audio and check these are both working and that you can adjust the volume with the sliders.
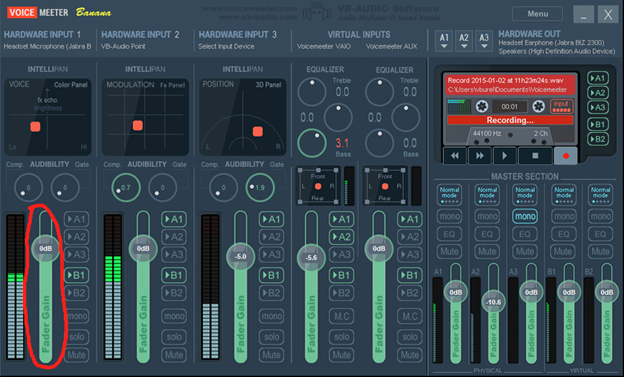
Step 4: Using Voicemeeter to adjust audio
Now we’ve got the basics set up, let’s look at how we can use Voicemeeter to give us full control of our audio.
Let’s take a look at one of the Hardware Inputs. On the left you have a current volume bar and just to the right of this is a slider that can be used to adjust the volume quickly and easily to how you want it.
On the right of the slider are several buttons that tell you where your sound is going. In the above photo, A1 is highlighted so it’s being routed to your A1 device but you can click on the A1 button to instantly stop sound being sent to that device.
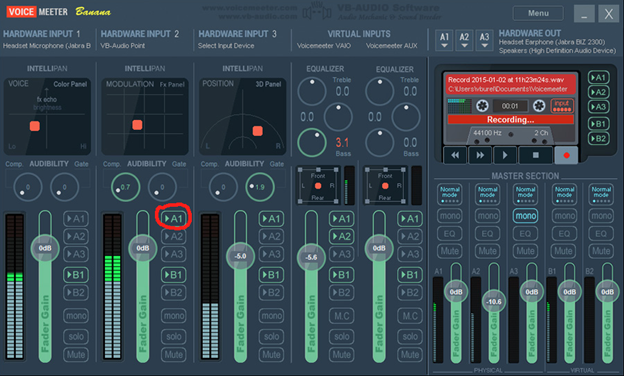
If you chose an extra A2 device then simply click the button to send the sound there. For example, you might want Spotify to go to your speakers and this would be the A2 choice, but it won’t go through your headset which is your A1 choice.
Important: Deselect B1 from every device except your microphone – this should be Hardware Input 1 if you were following the steps above.
Step 5: Setting up Discord
Now we need to make sure your other programs like Discord and OBS have their settings adjusted so they will work seamlessly with Voicemeeter.
Open Discord settings and go into Voice & Video. You should see a screen like this:
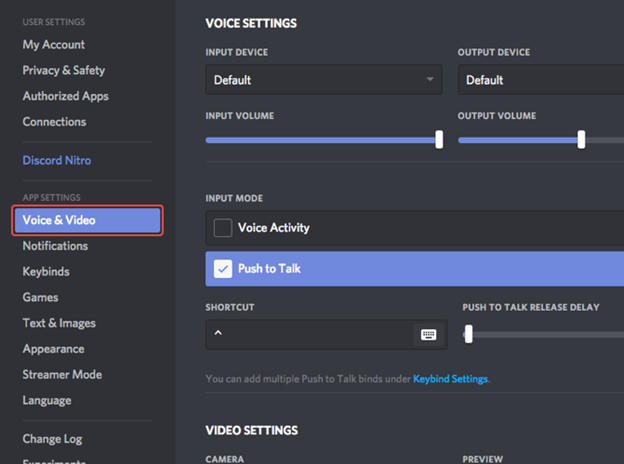
Change Input Device to Voicemeeter Output (it’s switched as mentioned before) and change Output Device to CABLE Input.
You might remember in Step 3 we changed Hardware Input 2 to WDM Cable, well this is where it connects so you have your Discord audio in its own channel that you can adjust the volume easily or even mute Discord on OBS entirely.
Step 6. Setting up OBS & Streamlabs OBS
Next, we want to set up OBS / SLOBS (both work in the same manner). Open Settings and go to Audio and you should see something like the following:
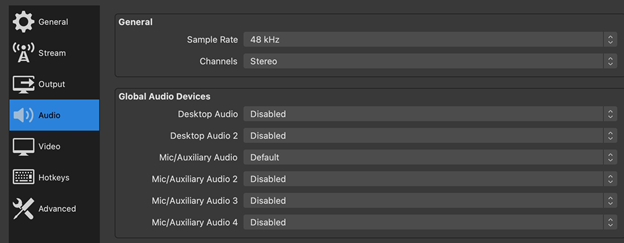
Firstly, you are going to want to disable every selection in Global Audio Devices (as seen in the picture above). Click Ok to save the settings once you are finished.
What we will do instead is Add Sources (use the + button) and we want to split it up into four sources as follows:
- Audio Input Capture – Party Chat – Device: CABLE Output
- Audio Input Capture – Microphone – Device: Voicemeeter Output
- Audio Output Capture – Spotify – Device: Voicemeeter AUX Input
- Audio Output Capture – Game / Desktop – Device: Voicemeeter Input
You’ll probably recognize some of what we are doing as connected to the earlier steps, this is where we bring it all together.
You can even save these four Sources as a group and then copy them into any scene you like which can save a bit of time if you do it a lot.
Now if you open your audio mixer, you can see the four Audio Sources and adjust and change the volume or mute each of them very easily.
Step 6: Make sure Voicemeeter boots on startup
This is the final step and ensures that all your settings will load each time you start up your computer. This is a short, simple step that ensures there’s a minimum of messing around each time you start your computer.
You need to open Voicemeeter again and look for Menu at the top right of your screen window. Make sure the following settings are chosen (with a tick):
- Auto Restart Audio Engine
- System Tray (Run at Startup)
- Show App On Startup
There you go! Now you know how to split audio to create separate audio tracks in OBS.
This will give you full control over the sound levels, as well as the ability to completely mute specific sources.


Awesome guide! I can finally play music on my stream! My viewers are amazed. https://twitch.tv/morhook
I have lost all discord audio except for the voice chat. I have no leave/join sounds, no sounds from videos, etc. I have streamer mode on, but I have sounds and notifications unchecked, so, I am not sure what happened now?
disregard my last comment
so im trying to play music in my mic on discord and omegle but its not loud 3enough how do i do it?
Hello! I have followed the steps exactly and almost got everything working perfectly. The last issue I have is when I reduce the Aux Virtual Input volume in voicemeeter, it does not seem to change the volume the music is playing in Streamelements. If I mute the music entirely in voicemeeter, streamelements is still detecting the input and playing the music. I have confirmed that the device selected for the source is the Voicemeeter Aux Input. Any ideas you might have would be appreciated!
This guide is perfect mate! Quick question, so In game what do i have to choose as my input and outputs?
You have to output to “default” device or “Voicemeeter Input”
Followed the guide to the letter, read through it three times. Completely messed up my computers audio. My micsource was picking up audio from iTunes, desktop, and my mic. Desktop source was picking up Mic and desktop. My iTunes audio source wasn’t picking up anything. Some of the input and output options that were listed in this guide were not options in streamlabs, which I’m assuming is my problem. Now comes the headache of removing voicemeeter and the virtual cable. really upset that I even tried.
Ah RIP – sorry it didn’t work out for you! It’s worked for many others, but I guess there’s a reason people have a love/hate feeling about voicemeeter.
Thank you very much for this guide. I knew there was a way to do this, but didn’t take the time to educate myself on how. This is running well. Thanks again! Don’t forget to support the app. I sure will.
Check Discord or any other apps for “streaming mode.” Sometimes these disable alerts. Good luck!
Hello! My only issue I’m having is that in discord for output device, I don’t see the option to change it to Cable Input. I would love some help, thank you~
Hey PandaPhilly, I’d go back and make sure you set everything up like the guide showed. There’s also this video that might be easier to follow visually: https://www.youtube.com/watch?v=AP6dweJK8gc
hi! I’m having troubles hearing my soundalerts. my audience can hear them but I can’t. I’m wondering if its a voicemeeter setting?
Hey Peach, tough to say with little details. If you’re using OBS, do you have the soundalerts set to monitoring? (advanced audio properties > audio monitoring on)
Hello! All this is helpful for me so far, but any tips for console audio? All audios have been replaced following the steps, but my original ps5 audio is still there with the bar listening to the game, except i cant hear it.
Hmm I don’t have any experience using a console unfortunately. Are you referring to not hearing the audio through OBS? Have you tried making sure the audio monitoring is on? (in the advanced audio properties in OBS)
Thanks a bunch. I’ve been fiddling around in the evenings and nights for the last week, trying to get streamlabs to run just the way I want it. The audio is the last hurdle that I need to overcome. Can’t wait to do this tonight. Awesome information.
Awesome! Hope you find it helpful 🙂
awesome guide thank you so much!
Happy to help!