Discord and OBS go together like peanut butter and jam. But sometimes you just want some toast without one or the other. The same can be said about excluding Discord audio from OBS.
 In this guide we’ll show you how to mute Discord on OBS Studio so you can stream without your viewers getting jebaited from Discord notifications, or hearing the voices of the people you’re talking with in Discord.
Whatever your reasoning for wanting to make OBS not pick up Discord audio is, we’ve got you covered. These methods will work for you if you’re wanting to mute Discord on Streamlabs OBS as well.
I’ll be using OBS Studio for this guide, but the Streamlabs OBS GUI is very similar so you can still easily follow along and get it working.
How To Mute Discord Notification Sounds on OBS
If all you’re looking to do is make sure any Discord notifications aren’t heard through your stream or recording, then here are a couple ways to mute Discord notification sounds on OBS:
Streamer Mode
By default when you have OBS open while Discord is running, Discord will enable Streamer Mode.
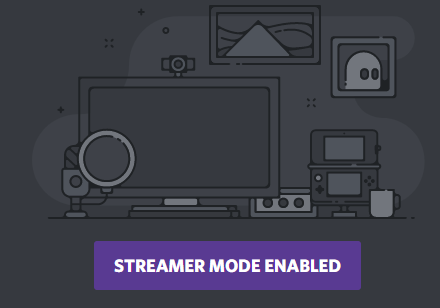
Streamer Mode has a few beneficial privacy options, with one of them being the option to disable sounds. So any and all sound effects that would normally get played through Discord are now muted.
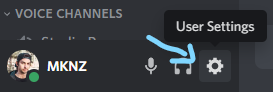
1. To enable, or make sure Streamer Mode is enabled go to your User Settings (bottom left).
2. Scroll down the left side menu and click on Streamer Mode, then make sure the Enable Streamer Mode button is checked.
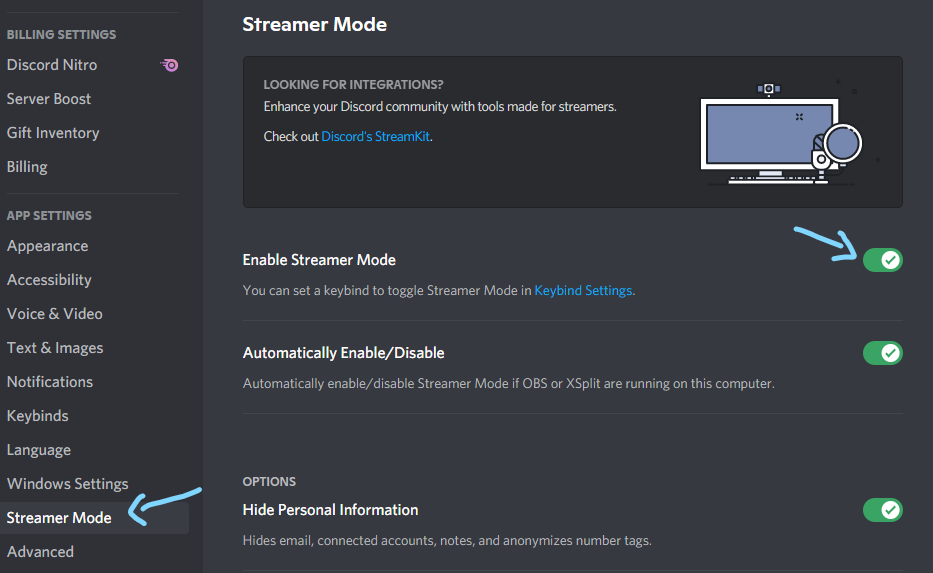
3. Now make sure the Disable Sounds option is checked in the Stream Mode menu.

Muting Notifications With Streamer Mode Disabled
If you don’t want to use Streamer Mode but still want to make sure OBS doesn’t pick up any Discord notification audio, then here’s how to do that:
1. In your User Settings, scroll down the left side menu and click on Notifications (under the App Settings submenu).
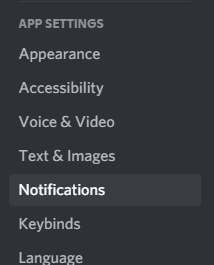
2. Now in the Notifications settings, scroll down until you see the Sounds options.
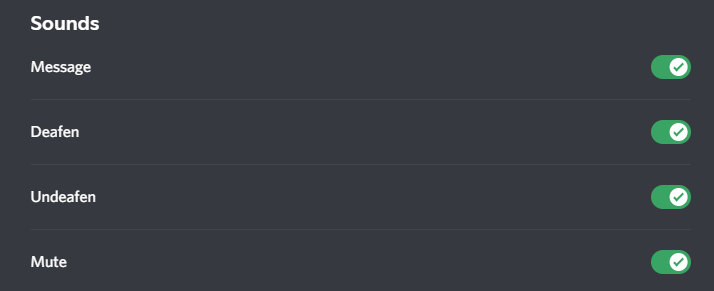
3. From here you can now enable or disable specific Discord notification sounds so they’ll be muted for you and on OBS.
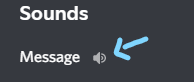
You can even preview each sound by hovering your mouse over the text to reveal a little speaker icon then clicking on it to make sure you’re muting the correct sounds.
How to Mute Discord Voices on OBS So Your Stream Can’t Hear Them
If you’re trying to figure out how to mute Discord voice chat in OBS so only you can hear the audio while it’s muted for your Twitch stream’s viewers then here are some methods to try for that.
Using Voicemeeter
Some people are a little turned off by having to use 3rd party software to make OBS not pick up Discord audio, but this is truly the best way to go about it at the moment until OBS decides to implement a native solution.
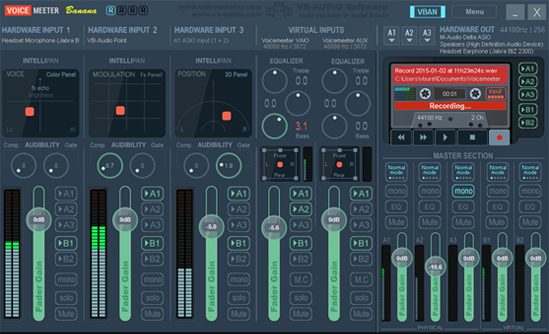
It can be a little intimidating at first, but once you get it figured out you’ll be glad you did. The amount of control you’ll have over not only your Discord audio, but all sounds in general while streaming is a huge quality of life improvement as a streamer.
So with Voicemeeter you’ll be able to:
- Designate Discord as its own audio source in OBS.
- Manage the volume levels or completely mute Discord in OBS, so you can still hear the Discord audio but your viewers won’t.
We have a full guide here on how to split audio in OBS using Voicemeeter, so click that and get that all setup first.
Then once you’ve finished Step 6 in that guide, you’ll now have a separate audio source in OBS or Streamlabs OBS for Discord which will allow you to mute the audio completely.
Without 3rd Party Software
If you really don’t want to use Voicemeeter, then there is a method for muting Discord audio in OBS without 3rd party software.
It involves assigning only the audio sources you want played through OBS a new output source in your Windows App volume and device preferences settings. Like Realtek or something else not in use as your main output.
Then creating a new audio output in OBS using the output source you chose (e.g. Realtek), and muting your main audio source in the OBS audio mixer.
I imagine that was kind of confusing to understand, so it’ll make more sense in the steps below.
Also, there are a couple of downsides to this method:
a) You’ll need to always have OBS open to hear all the sounds you’ve assigned to the specific audio output source (will make sense if you follow the guide below).
Or you could always flip the audio output sources back to their defaults every time you stop streaming or recording through OBS.
b) Not every game will work with this method (the sound won’t come through). It worked when I tested Ori And The Will Of The Wisps, but Rocket League didn’t work.
If you’re ok with that, here’s how to set it up:
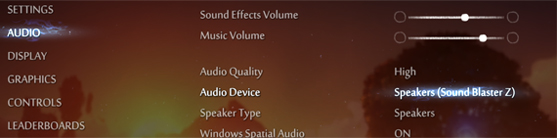
1. Go to your OBS audio settings (File > Settings > Audio) and under Global Audio Devices, for Desktop Audio 2 select a device other than the device you’re using in the main Desktop Audio, then hit Apply to save your changes.
Since I have a soundcard in my PC, my option is the Sound Blaster Z. If you don’t have a sound card, you’ll likely see something like Realtek. Use that one.
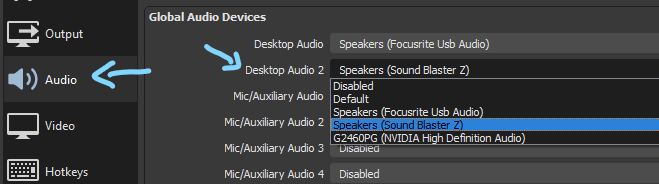
You should see another audio source in your OBS Audio Mixer now called Desktop Audio 2.
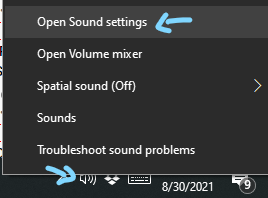
2. In your system tray, right click the speaker icon and select Open Sound settings.
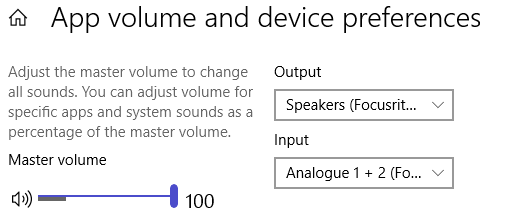
3. In the settings window, scroll down to the bottom and select the App volume and device preferences option.

4. At the top you’ll see your main output device. You don’t want to use this output device when selecting an output device in the next steps.
5. Open up every app, game, etc. that you want audio to play through OBS to your stream (so your viewers can hear it).
You will then see them show up in the App Volume settings in the App volume and device preferences window.
6. Change their outputs to the same output you set in OBS as your Desktop Audio 2 device.
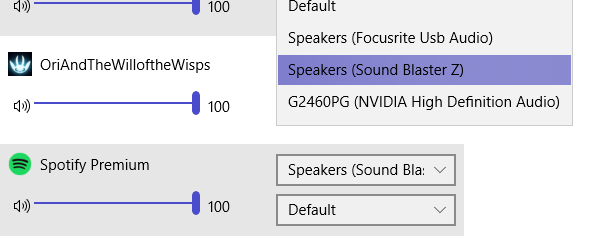
Do not change the output device of Discord. Leave Discord as default output.
Now if you play audio through any of the devices you just changed, you shouldn’t hear any sound.
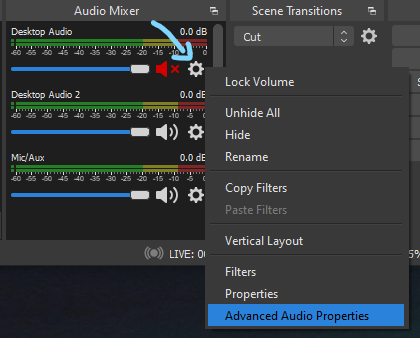
7. Go back to OBS and click on the cog wheel of any of the audio sources in the Audio Mixer and select Advanced Audio Properties.
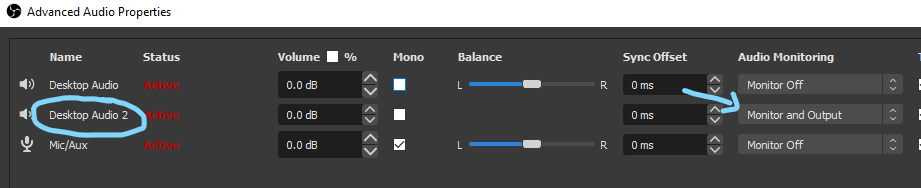
8. Change the Audio Monitoring of Desktop Audio 2 to Monitor and Output.
You should now be able to hear all the audio from the games/apps you changed output devices to from step 6.
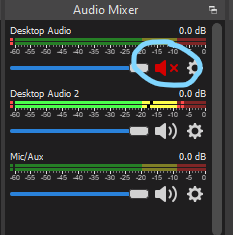
9. Now mute the audio coming from the main Desktop Audio source in OBS’s Audio Mixer.
What did this do?
So now you have an audio source in OBS that is capturing all the sounds you specifically told it to capture using Desktop Audio 2 + changing the outputs in your App volume and device preferences.
But you can only hear it because you have the audio monitoring set to Monitor and Output i.e. it plays the audio for you (monitor), and it plays the audio for OBS/your viewers (output).
All of that audio that you can hear from Desktop Audio 2 is also being picked up and output in the main Desktop Audio source. This includes Discord.
So by muting the main Desktop Audio, you’re muting all the duplicate audio sources that you assigned in Desktop Audio 2, PLUS Discord.
You’ll still be able to hear Discord on your end, but now Discord will be muted in OBS and your stream or recording won’t hear Discord.
Game Audio Settings
If your audio isn’t working for a specific game using this method, make sure the same audio device that you selected for Desktop Audio 2 is selected in the game’s audio settings.
Some games don’t give you this option (like Rocket League), so you’ll be out of luck and won’t be able to use this method for that specific game.
There you go! You now know a couple of ways to stream without Discord audio in OBS so your viewers won’t be able to hear voice chat or any other sounds playing through Discord.