With all of the streaming programs out there, it’s to no one’s surprise that OBS Studio is the go-to choice for most streamers. With a simple interface and tons of features, OBS studio has become the staple for stable streams on virtually all platforms.
In this guide, we’re going to dive deep into the settings of OBS Studio to optimize the program to work better on your computer as well as optimizing your encoding settings to give your stream the edge in quality.
Let’s get started.
Here’s What You’re Going to Learn:
- How to find your Upload Speed for Streaming.
- For Twitch, How to Determine the Best Ingest Server to stream to.
- Optimize OBS Studio to Perform Better for Streaming.
- Adjust Output and Encoder Settings to Maximize Performance and Quality.
- Ways to Troubleshoot for the Best Settings for Your Stream.
Finding Your Upload Speed
Head over to speedtest.net and click the “Go” Button in the center of the website. Here, it’ll run several tests to determine several factors in the speed of your internet.

We’re focused mainly on the Upload Speed. Most people have a speed of at least 1Mbps, but that won’t get you by for streaming. If your upload speed is faster than 3Mbps, you are safe to enter the streaming world.
To find out data usage while streaming, check out this guide on how much data Twitch uses.
Anything higher than 10Mbps is going to help you stream at the absolute max settings for best quality, but we’ll break that down later in the settings.
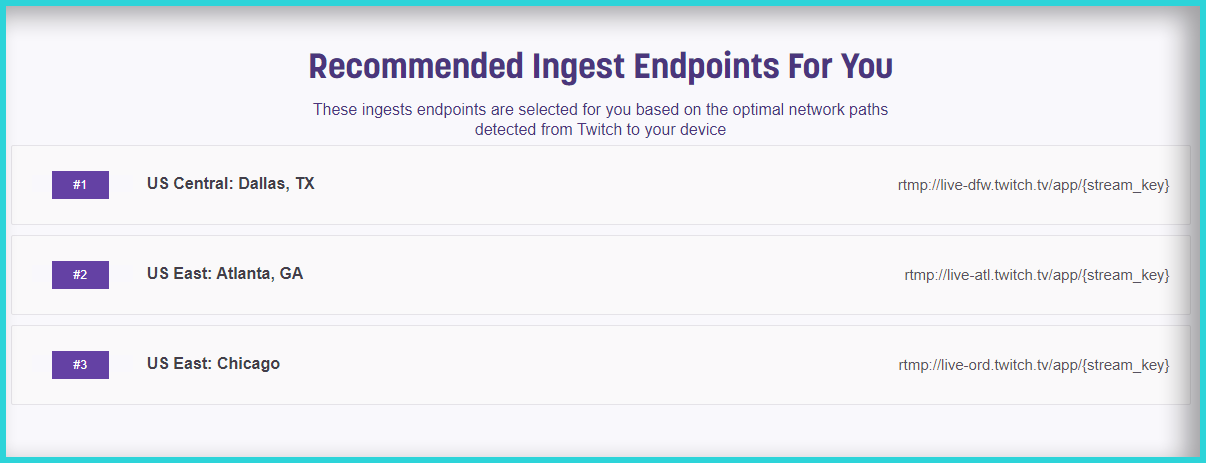
Finding the Best Ingest Server to Stream to (For Twitch Streamers Only)
Twitch has many servers to choose from to handle your streams, and they have a website dedicated to helping you figure out which servers to stream to.
Head over to stream.twitch.tv/ingests/ and scroll down the page. This will tell you your top 3 Ingest Servers to stream to, based on your current internet connection. This will be handy later on when we setup our stream settings.
Optimizing OBS for Streaming
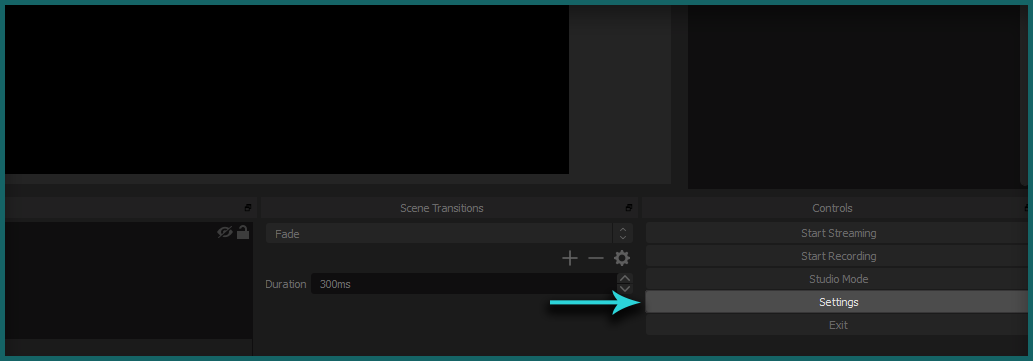
Let’s Head over to OBS Studio. In the bottom right of the program, we’ll click on Settings. We want to start off with our General Settings.
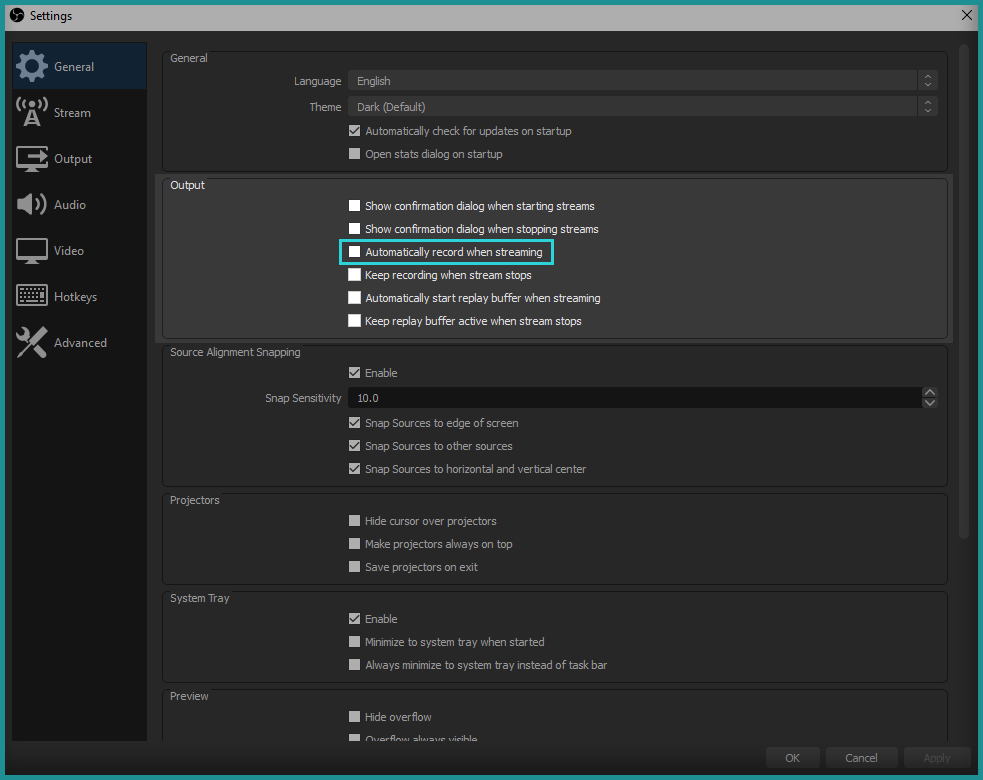
General Settings
Most of these settings are for cosmetic purposes or for helping you set elements for your stream. We want to look at one setting here. Make sure “Automatically Record when Streaming” is unchecked. Although this seems like a no-brainer, Recording while streaming can really take a hit on performance. Just in case it checked itself, let’s make sure it is taken care of.
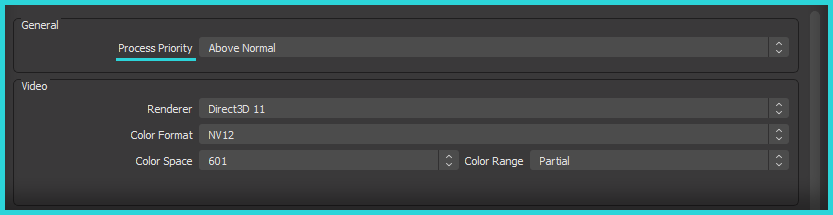
Advanced Settings
Moving on to the Advanced Tab on the left, we want to take a look at our Process Priority. By Default, this is set to normal. We want to give OBS priority over most programs, so we’ll set this to “Above Normal.” With this selected, the Stream will have priority over the games and background apps that are running.
Next, we want to scroll down until we see “Enable Browser Source Hardware Acceleration.” Although this sounds like something that needs to be checked, this can cause problems with browser sources and programs like Google Chrome. Unchecking this requires you to restart OBS Studio, so do this before moving on to the next step.

Setting Up OBS Studio for Your Best Stream
After we’ve handled optimizing OBS Studio for Streaming, it’s time to perfect the settings for our stream. We’ll start with the simple settings first.
Setting Stream Settings
Head over to the Stream Tab back in the settings. Here, we want to choose our Streaming Service. If you are using Twitch, you’ll also want to change the Server to one of the Ingest servers we saw earlier. You’ll then have the option to either connect your Twitch account, or enter in your stream key. You can press the “Link” hyperlink beside the input box to take you to your Twitch stream key.
For YouTube, you want to use the Primary Ingest Server, and do the same for your Stream Key.
For Mixer, you want to decide what is best for you. If you favor lower latency in your streams for more chat interaction, select the Mixer FTL service. If your internet struggles with this, you can choose the RTMP service. Mixer doesn’t have as many Ingest servers, so you can leave the server to auto and enter in your stream key.

Check out this article for changing your stream delay on Twitch.
Optimizing Output Settings
Next, we’ll be diving right in to the Output settings. At the top, we’re going to change the output mode to “Advanced” so we can see all of our options.
We’ll take a look at the pros and cons of the encoders.
x264 (CPU Encoding)
- Lower Latency
- Better Quality at Lower Bitrates
- Best for 2 PC Setups or Better CPU than GPU
NVENC H.264 New (GPU Encoding for Nvidia Graphics Cards) / AMD H.264 (GPU Encoding for AMD GPUs)
- Transfers weight of stream to the GPU
- Slightly Higher Latency
- Better Quality at Higher Bitrates
If you are on a one PC setup, it is most likely the best choice to stream through your GPU using the NVENC Encoder for Nvidia cards or the H.264 Encoder for AMD. The newest NVENC encoder also allows for better performance as well as better quality to try to compare to streaming via CPU on a dual PC setup.
Let’s make sure “Enforce Streaming Service Encoder Settings” is checked before we move on.

Rate Control and Bitrate Settings
Whether you chose CPU or GPU, your Rate Control should always be set to CBR. This means “Constant Bitrate” which forces your stream to maintain the quality set by your bitrate.

Next, we’ll look at our Bitrate. Remember our upload speed we found out from the first step? It’s time to remember that number.
Your bitrate determines the overall quality of your stream. The higher the upload speed, the better the quality of the stream. You want to take that number you found and divide it in half.
That is your safe streaming bitrate, as anything higher gives you a chance to have network lag based on anything using your network. If half of your total upload is still higher than 10mbps, you are free to not worry about network issues.
Before we dive in to the different bitrate settings, I want to start off with this. If you are streaming First Person Shooter games like Fortnite or Call of Duty, it is better to use a higher bitrate and a lower resolution.
720p with a bitrate of 5mbps will always look better than 1080p at 3mbps. With that being said, let’s head into the details.
For Twitch
The highest bitrate Twitch allows even for partners is 6000kbps. At 6Mbps, even 1080p streaming will have artifacts. Here is a general table on what you should set your bitrate to based on your upload speed.
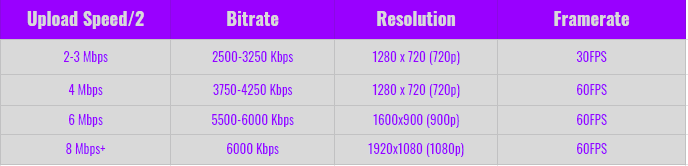
If you have the network and computer power, the best settings for quality on FPS games for Twitch is 6Mbps or 6000Kbps, with a resolution of 900p, which we’ll be covering shortly.
For YouTube
With YouTube, the max bitrate for streaming soars way above its competitors. On the platform, the max bitrate is a whopping 51 Mbps, but that is a number most people will never reach. In general, the settings are very similar to setting up on Twitch or other platforms.
Here is a general chart made specifically based around YouTube’s guidelines for live streaming to their platform.
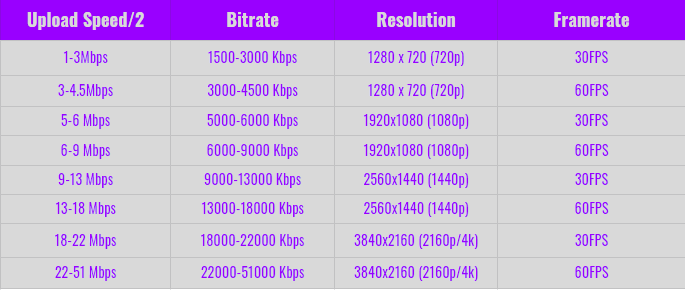
For those who want the best 1080p stream and have the performance to back it, set your bitrate to 9000 Kbps, and your resolution to 1080p, which we’ll be covering shortly.
For Mixer
Mixer doesn’t quite boast as high of a bitrate max as YouTube does, but it outshines Twitch with a limit of 10mbps. This gives those looking to stream at 1080p with a little bit more headroom for quality.
Although we all want to stream at the best settings possible, we still have to keep in mind our network’s ability. Here is a general chart on what to stream at on Mixer.
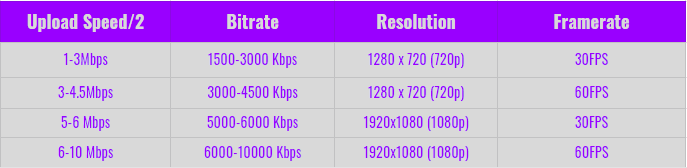
For the best 1080p stream and the network and PC to back it, you’re look right at 10,000Kbps bitrate with a resolution of 1080p, which we’ll be covering here shortly.
The Final Output Settings
On most platforms, the Keyframe Interval should be set to 2. If you leave it to 0, it will automatically adjust depending on the platform you stream to.
For the Preset settings, this is based on your PC. If your PC is stronger than most, you can set this to Quality or even Max Quality. If your PC is more on the struggling end of the spectrum, lowering this to Performance or Max Performance might help smooth things out.
The Profile setting should be set to Main or High. For the most part, High is more often used on most platforms.

Let’s move on to our Resolution settings over in the Video Tab.
Video Settings
For your Base (Canvas) Resolution, you want to set this to your monitor’s resolution. For most, this should be 1920×1080.
The Output (Scaled) Resolution however, is what your stream resolution will be. You want to set this based on the guidelines from the previous section based on your bitrate.
The Downscale Filter should be set to Lanczos (Sharpened Scaling, 32 Samples). This gives the smoothest look when downscaling to lower resolutions.
The FPS Value should be set according to your resolution and bitrate. In general, 720p streams at 60FPS will look better than 1080p streams at 30FPS. The higher the framerate, the harder your PC has to work.

Troubleshooting Streaming Issues
So you’ve made it all the way through the guide, and you go to stream live. As soon as you click “Go Live”, OBS Studio starts to drop frames. The square turns red, and you are running into issues and laggy streams.
A common problem many new streamers face as their learning the ropes of streaming.
We’re here to help.
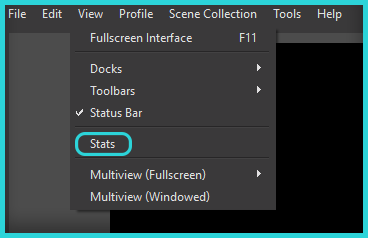
Let’s start by determining if the problem is with your PC or your network. Maybe you looked at the guidelines and pushed a couple of settings up a notch, and you’re not sure what is causing the dropped frames. OBS Studio has a status window to show why the frames are dropping.
At the top of OBS, select “View” and “Stats“. A very complicated looking box will pop up, but we only want to look at two of the sections.
“Frames missed due to rendering lag” is due to your GPU overworking itself, and not being able to keep up.
- Start by reducing your Resolution.
- If you are trying to stream at 1080p 60FPS, drop down to 720p 60FPS.
- If this doesn’t alleviate the symptoms, adjust your Preset option in the Output Tab. Lowering it to Max Performance might be the little edge you need.
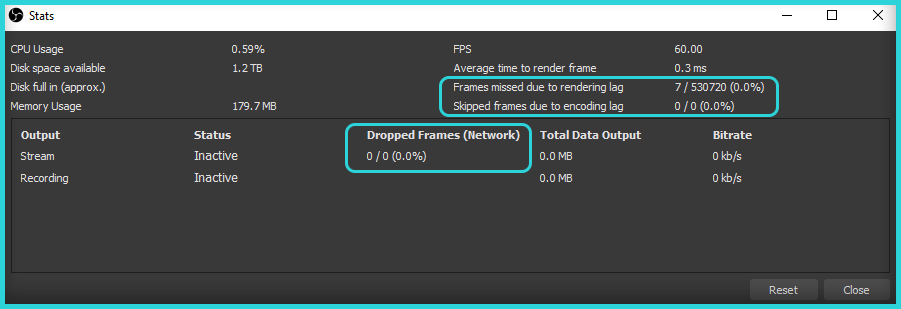
During stream, OBS might prompt you with “Encoding Overloaded“. This is a sign of “Skipped Frames Due to Encoding Lag”. This is due to your CPU being overloaded. You’ll want to take the same steps and reduce your Resolution to start with.
If you are dropping frames due to your internet struggling, you’ll see this in the “Dropped Frames (Network)“. If you are streaming and your upload speed takes a hit, you’ll see your frames being dropped here.
To alleviate this, start by reducing your Bitrate. Your bitrate determines how much of your upload speed you are using, and lowering it will definitely ease some of the stress on your network.
If you have to drop too far, make sure to check back on the guidelines for what to stream with. Streaming at 4kbps at 1080p will look awful compared to a 4kbps stream at 720p. At lower resolutions, the same bitrate will give better quality per pixel.
You’re all set! You are ready to take on your next stream with better settings and no issues.
If you have any questions, feel free to leave a comment below 🙂
Guide written by AlfredGG. Check out his Twitch stream here, and YouTube channel here.


So, if I don’t have one of those graphics cards, I’m SOL?
comments from 2019 tell me that’s when this article was written. OBS has updated and changed key components since then. while this was somewhat helpful and maybe partly improve my streams, it won’t have the full effect because it’s outdated information
Yep, true! We need to work on updating this one. Thanks 🙂
its really help full thank you so much.
man i still cant find in your chart 25 upload speed 720 resolution 60 frame and what bitrate i need to put? youtube
By far the best comprehensive explanation of these settings!!!!! Thanks
My upload is 21.2 Mbps am I good for 10,000 Kbps on mixer????
You should be yup 🙂 Try it out!
Thanks so much for all the information!
My biggest issue is I make multiple changes and after an hour or so of streaming I end up with a 15 second delay. Delay option is unchecked so I know it isn’t that so not sure why it happens.
It could be because you have the delay enabled on the twitch site
I tried it out and my bitrate is 1500, so actual upload divided by 2 and match that with the numbers here
My upload is 3Mbps, should I use 1500 bitrate or I can use 2500? 720 30 fps. I don’t get what number I should divide by 2
my mbps is 133.15 with a laptop ;-;
Thanks so much for all the information! Very well written! I feel so much better about using OBS.
You’re very welcome! Feel free to drop by if you ever have any questions 🙂