So you’ve chosen Streamlabs as your streaming app and now you’re trying to figure out how to use their Alert Box to add alerts to your stream.
With the help of this guide and a few mouse clicks on your end you’ll soon have everything set up that’ll allow new alerts to start popping up on your stream, giving your stream a more professional experience!
Here’s What You’re Going to Learn
- How to navigate the Streamlabs Alert Box settings and make necessary edits to customize your alerts.
- How to connect your Streamlabs alerts with OBS Studio so any new followers, donations, subs, etc. that you get will pop up as alerts during your stream.
- How to get specific alerts to show up in different areas of your stream.
- How to add alert variations so that different alerts pop up based on certain conditions, like specific donation amounts or for Tier 2 and 3 subscribers.
- How to troubleshoot your alerts if they aren’t showing up in OBS.
Guide Length: 6 minutes
Main Streamlabs Alerts Settings
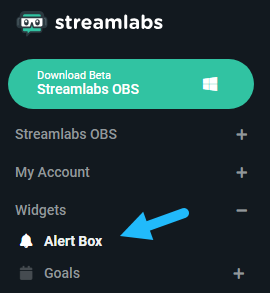
Once you’re logged in to the Streamlabs Dashboard, find and click on the Alert Box widget that’s found in the left sidebar.
You’ll now see a bunch of different settings that – if you’re an Alert Box virgin – might be a little overwhelming…
So let’s first go over the main options you’ll likely want to edit for your alerts.
Then I’ll show you how to set everything up in OBS.
Already got a handle on the alert settings? Click here to see how to set everything up in OBS.
Widget URL
The first setting you’ll see that you can play around with is the Widget URL.

This URL is what you’ll be copy and pasting into OBS Studio to get your alerts showing up on your stream. We’ll go over how to do that later on in this guide.
You’ll also see check boxes next to each alert type.
This allows you to do a couple things…
Primarily, the purpose of this is to simply disable alerts you don’t want popping up on your stream.
Another thing you can do with these checkboxes is create different Widget URLs for the purpose of having specific alerts show up in different places on your stream.
For example, if you want your New Follower alert to show up in the top middle of your screen, and you want new donation alerts to show up somewhere else then here’s how to do that using the check boxes:
By only having the Following box checked, this creates a unique Widget URL that will only trigger an alert when you get a new follower.
Then you can do the same with the Donations check box (or any other alert box), and create a Widget URL that only triggers donation alerts.
Now you add these two separate URLs to OBS and then move them wherever you want on your stream so they show up in different places on your stream.
Test Alerts
Below the Widgets URL you’ll see a bunch of buttons that have the text, “Test Follow”, “Test Subscription”, etc.

You’re a smart person so I’ll assume you already pieced together what these buttons do.
To actually see the test alerts in action there’s two ways to do it…
The first way is to click the green, Launch button that’s on the far right side of the Widget URL.
This opens up a new window with a bright (like put your shades on bright) green background.
Now once you hit any of the test buttons your alert will pop up in that new window.
You can also see your test alerts in OBS when you have your Widget URL set up in OBS – again, I’ll show you how to do that in a sec.
Alert Settings
Further down the Alert Box page you’ll see a bunch of tabs for each of the alerts individual settings.

Let’s use the Follows tab to go over the main settings that you might have questions about.
For the sake of time, I’ll be skipping over the settings that are self-explanatory.
Alert Animation
I know I just said I’d be skipping over the settings that are self-explanatory, but there’s one thing I wanted to bring to your attention regarding the outro animation option.

If you set the outro animation to “None” then your alert will stay on your stream indefinitely until a new one pops up.
So make sure to at least give it a Fade Out or something so that the alert disappears after the duration you set it to.
Message Template
This is the text that will pop up with your alert graphic. The {name} parameter will be replaced by the username of the viewer who followed/donated/subscribed/etc.

You can keep the template default or get creative and add something more specialized to your stream.
Some examples:
If your community has a name like, “The Wolf Pack” or something original like that then you can try something like:
{name} just joined The Wolf Pack!
Or you can set up something simple like:
Thanks for the follow, {name}!
For mine I just have it as, {name}, since my alert graphic says New Follower.
See below for an example:

Image
This is where you can choose from one of Streamlabs’ graphics for your alerts or upload your own custom alerts.
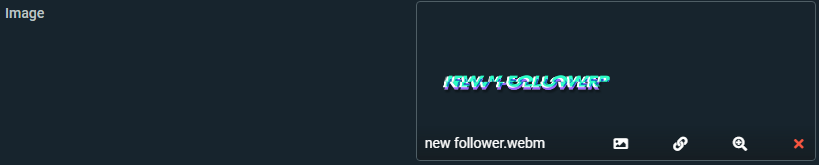
You can also add GIFs to Streamlabs for your alerts for a bit more flair for your stream.
Sound
Same deal as the image option – use one of the default sounds or upload your own, OR if you don’t want any sound being played during your alert then just remove the file by clicking the red X.
![]()
Alert Duration
If you’re using an animated alert that doesn’t loop, then you’ll want to make sure to set the alert duration to how long the alert takes to complete its animation.
![]()
If you have the duration longer than the animation then the alert will start its animation again. Not ideal for most situations.
Alert Text Delay
This setting is for delaying how long you want to wait till the alert text to shows up.
![]()
So if you have an animated alert that takes 2 seconds to have the space where you want text displayed visible, then you’ll want to set the Alert Text Delay to 2 seconds.
Which will result in the text not showing up in the alert until the 2 second mark.
One thing I wish Streamlabs had is an option to make the text disappear before the main alert animation ends.
Some animated alerts have a closing animation, and with no option to remove the text early then the text just stays there visible and out of place.
See what I mean below:

Ideally you’d want the StreamplayGraphics text to disappear right before the green bar begins its closing animation.
But with no option to have the text end early, it just remains there while the alert finishes closing.
I know StreamElements has this option for their alerts. It’s called, Text disappearance offset.
So if that setting is something that’s important to you, then you might want to give StreamElements a try.
Enable Custom HTML/CSS
You can do some pretty funky customization for your alerts if you or someone you hire knows how to code.

If you’ve ever watched Ninja’s stream you might have seen one of his sub alerts where an animated ninja pops up from a puff of smoke and slices the viewers name who subscribed in half.
The text being split in half is only achievable through custom HTML/CSS.
Some basic stuff you can do with the CSS is moving your alert text so that it aligns better with your alert.
Most streamers can just leave this setting disabled.
Alert Variations
Alert variations are pretty cool, and best used for things like new subscriber and donation alerts.
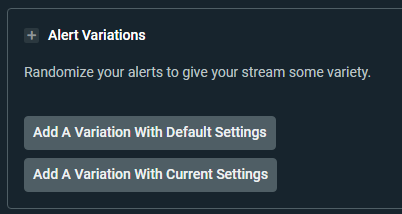
The variations let you change how your alerts will look based on certain conditions.
Sub Conditions
Some subscriber conditions you can use are if the person has subscribed for a certain amount of months, or subbed using tier 3.
So you could set up an alert variation that has a way more intense alert graphic/animation for your tier 3 subs to show them your appreciation.
You could also set up a special alert for your subscribers who reach certain month milestones like a 12 month subscriber.
Donation Conditions
For donation variations, you can have conditions for people who donate an exact amount, or have the donation meet a certain threshold.
So if you’re a streamer who’s into the whole 420 blaze it culture ![]() then you could set an alert variation that has something special for viewers who donate $4.20.
then you could set an alert variation that has something special for viewers who donate $4.20.
You see a lot of top streamers using donation variations for their alerts.
Shroud for example has his set so that when someone donates at least $50 the alert turns into a more dramatic version of his case opening alert animation.
When You’re Done Editing Your Alerts
We just covered the main settings for when customizing your Streamlabs alerts. So when you’re done, make sure to hit the Save Settings button that’s found at the bottom of the page.
If you’re wanting to test your alerts before adding them to your OBS then use the Launch method I showed you earlier in this guide.
When you’re happy with how your alerts look, then it’s time to add them to OBS to make things official!
Need New Alert Graphics?
I run another site that has some pretty cool looking graphics available for streamers.
Check it out here if you’re interested!
How to Add Streamlabs Alerts to OBS
Once you’ve customized your stream alerts to your liking, make sure you’ve hit the Save Settings button at the bottom, then go back up to the top of the page where the Widget URL is.
You’re going to wanna copy the Widget URL then head over to your OBS Studio.
1. Once you’ve got OBS open, make sure you’re in the Scene you want your alerts to show up in.
2. Then in the Sources box: Right click > Add > Browser.
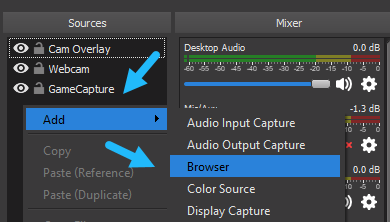
3. Name your browser source something like, “Alerts” so you can easily identify them.
4. In the new window that pops up, paste your Widget URL in the URL section.
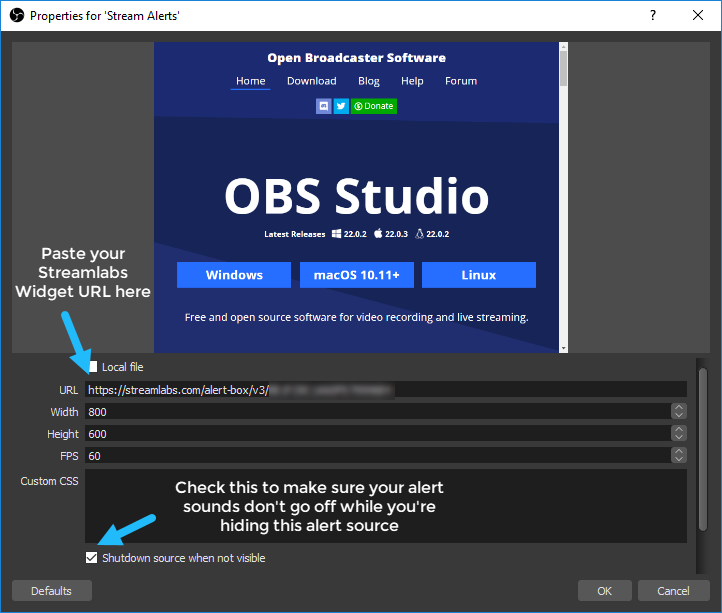
5. Then for the Width, Height, FPS, and Custom CSS options you can input your desired settings in there.
For my alerts I have the Width and Height at the default 800×600, and changed the FPS to 60.
I noticed that the higher resolution I made it (eg. 1920×1080), the smaller my alert text was in comparison to my alert graphic. So play around with it to find your desired look.
6. Then finally, make sure to check the, “Shutdown source when not visible” box.
If you leave this setting unchecked, then your alert sounds will stay play even if you hide the alert source in your OBS.
7. Now you can hit OK, and there you go – your Streamlabs alerts are now added to OBS!
You can now move and resize the source so your alerts are positioned where you want them on your stream.
Testing
Then to test the alerts in OBS, you can just go back to your Streamlabs Alert Box page and click on any of the Test buttons and your alerts will now show up in OBS Studio.
Streamlabs Alerts Not Showing Up?
One thing to be mindful of when adding your alerts to OBS is the positioning of your alerts browser source in the sources box.
The sources act as layers, so whatever source is at the top will be most visible, and any source at the bottom will be covered up by any sources above it.
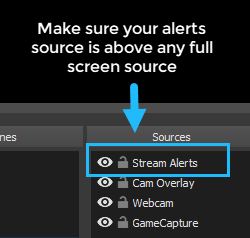
So make sure your alerts source is at the very top of your layers, or at least above any source you have that covers up the whole screen like your game/window captures.
You did it! Hopefully you now have your Streamlabs alerts all set up in OBS working smoothly.
If anything was confusing or you have any questions then please leave a comment below and I’ll try my best to help you out.
Have a good one 🙂


I added all the browser sources to obs but none of the alerts from facebook work. when I test the alerts they work but not when I’m live. Am I missing something or do the alerts not work with facebook?